Archive for June 2015

Tips for Painting for a Client

Thursday, June 18, 2015

tips for painting furniture
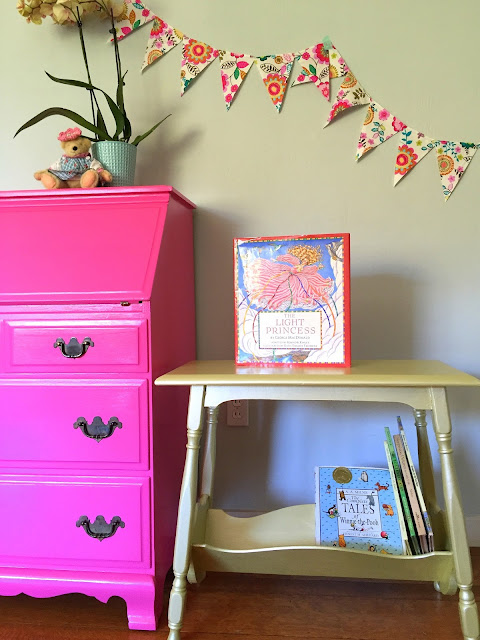
I finished these darling pink and gold pieces for a client a couple of weeks ago. It was so fun painting for her, when we were discussing color she told me she wanted something super bright and that to her red and gold are like neutrals. The hot pink is perfect for her!
pink dresser
I've just started painting for other people, and my learning curve is pretty steep but there are two things that I feel clearer about after this project.

First, I am an easily bored baby with a minuscule attention span and about half way through any project I start thinking about the next thing I want to do. When it's my own stuff I can flit back and forth between projects like a bi-polar butterfly, but when a client has their daughter's clothes in stacks on the floor because I have her dressers it is better to get it done promptly. Like a professional. Which is what I am going to dress up as for Halloween this year.

 So, in order to facilitate the timely completion of a project, it helps if I start with the hard parts first. That way I get the most difficult stuff done while I'm totally focused on the project. 

In this case the hard part was painting the cubbies inside of the desk...

and the spindle legs on the little table.
Which brings me to the other thing I learned this time around. When determining a price for the work, remember to consider those difficult areas in your quote. The matching dresser that I painted (not pictured) took about half the time to paint as the desk, even though it was much larger. 

Working on these pieces was super fun! I love the hot pink-and it matches Muffy's outfit quite well, eh? And Marc thinks it's silly for a grown woman to dress teddy bears...

Just for fun, here is a before photo too.
Linking up

Miss Mustard Seed's Slipcover Tutorial Review

Tuesday, June 2, 2015

I finished up the family room make-over (mostly) and jumped right into a job painting a dresser, desk, and bookshelf set for a client. The finish on the furniture was giving me a little grief, but I finally sucked it up, got out my palm sander, and sanded everything down to a beautiful smooth blank slate. I primed everything today and am excited to put the first coat of paint on tomorrow. I can't wait to show you!

But before that, I wanted to give a run down on my slipcovers. I primarily used Miss Mustard Seed's six part (yes SIX parts-God bless her) video series to get my bearings.
We inherited Big Brown from my parents about five years ago, and while the way it fit in our family room worked great, it has always been, well, big and brown. So very, very brown.
So I've been reading tutorials about making your own slipcovers for years, but most of them didn't quite make sense or just didn't look like something I could do. My sewing skills are limited to straight lines don't you know.

Here is a link to my Pinterest board with different slipcovering advice. Anyhow, when I decided to makeover the family room I finally got serious about making slipcovers. It was that tipping point where I figured even poorly made slipcovers were going to look better than what I had. 

I read a bunch about white slipcovers and using drop cloths as fabric but my mom talked me off that ledge by pointing out that we are a family of cave people. So I went with grey. 

I looked at our local fabric stores and couldn't find what I wanted at a price I liked too so I ended up ordering from Online Fabric Store. This is the second time I've used them and they are cheaper than retail and ship quickly. Winning.

I used this chart to figure out how much fabric to order-and then added 5 more yards for fabric insurance.
LINK

After that I studied Miss Mustard Seed's videos in earnest. She teaches to drape your fabric over the frame of your piece, cut the pieces while it is draped in place, pin the pieces together while they are on your sofa, and then sew the pieces together one at a time.
I love piping, and she has a video for that too! So I made a gazillion yards of piping and now I am a fierce piping expert. True story.
Here are some more "in process" photos.
As you pin and sew you are working with the slipcover inside out. After you sew each new piece you can flip your work right side up and lay it over the sofa to see how it's fitting. 

It's a little tedious, but it also lets you see any mistakes or adjustments you want to make before you get too far along.

The main piece of advice I would give you is to keep going even when things aren't lining up exactly perfect. See the corner of this slip? I couldn't make it lay flat for the life of me, but it looks fine with all the cushions on.
And speaking of cushions, nearly all of mine have little puckers and tucks in them. I just gritted my teeth and kept sewing. There is a noticeable improvement from my first cushion to my last, but I wasn't about to go back and resew any dang cushions. I had twelve of them for Pete's sake!

Do you see the chips?! That is why I couldn't have white!

In the end I am just so happy with how these came out; I am sending a big internet-y hug to Miss Mustard Seed for making such an awesome tutorial! Now you do it :-)


Copyright © Barnaclebutt | Premade Blog Design by Lilipop Designs