Archive for 2015

Painting A Duncan Phyfe Dining Room Table

Monday, September 28, 2015

Last week I shared some inspiration photos for how I might paint my Duncan Phyfe style dining room table that a friend gave me. And this week I painted it. It's like a Christmas miracle.

How to Paint a Duncan Phyfe Dining table

Probably around 18 years ago Marc and I were antiquing in Arlington, Virginia and we came across this ah-mazing French country table and chair set. The table was a humongous, rustic wood farmhouse table and the chairs were these beautiful fancy white chairs with an upholstered hoop back, like this:

The set also came with a super fancy humongous price tag, something like twenty thousand dollars-because it was antiques and all (and maybe had gold bullions in the seat cushions or something) -so clearly, we did not purchase it. But it stole my heart, and I have been trying to figure a way to get that juxtaposition of rustic and elegant going in my dining room ever since.

When my friend gave me this table I initially thought I'd paint it and sell it; but the more I looked at it, the more I fell in love with those legs.

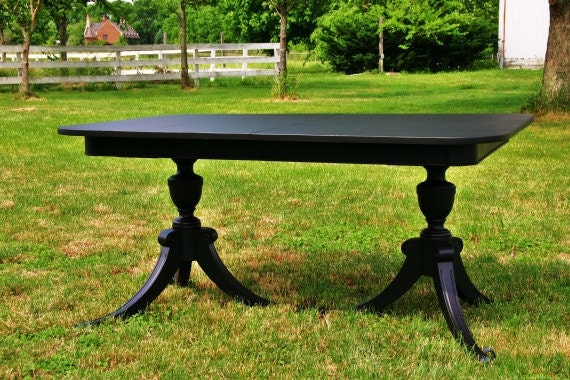
  Nice stems, right? I had to give it a try in my own dining room. What do you think? Of course, none of my chairs are in the photos because I am busy making a massive mess trying to reupholster them. Which begs the question, why when I decide to try and teach myself to reupholster do I choose eight fancy chairs as my first project? I think it's like a sickness...the same one that makes me decide to make slipcovers for an entire sectional sofa as my first slipcover project.

I need to read up on designing tablescapes; it's harder than it looks.

Here is a quick rundown on my process for painting this table. Its' original finish was a dark cherry. Here it is taken apart in my garage/studio:
I started by wiping it down with simple green to get any grease off, then I lightly sanded the top with a sanding sponge. I didn't sand the legs.

I used Annie Sloan Chalk Paint in "Old Ocher," because it has a little more of an aged look than old white to me. It's like there's a touch of brown in it. Here's the first coat.


I sanded lightly, wiped off the sanding dust, and put a second coat on everything. The legs looked great after that but I decided to do a third coat on the table top for durability. At that point I wasn't planing to distress the piece, but the details on the legs weren't standing out the way I wanted them to so I decided to try distressing them and I liked it better.

 It looked good so I did the table top to match. 
The final step was to wax. I thought about using poly since it is a table top, but these days I'm really liking the look and feel of wax, and after it fully cures it's supposed to be pretty durable. Also, we mostly eat at our kitchen table (or on the couch) so this table won't get a ton of wear and tear. Bottom line, I decided to risk it.

Even though I used Annie Sloan paint, my favorite wax is the Sweet Pickins soft wax. I love the way it rubs into the paint, the soft sheen it gives, and the way it feels when you run your hand over the furniture. I didn't really like waxing furniture until I used this product but now I am a fan. As usual, I have no affiliate links or anything, I just like the product.
You can kind of see the slight sheen it creates in this photo, and the way it adds depth to the paint color. Love.

Duncan Phyfe dining table painted with Annie Sloan Chalk Paint
We have family coming this week, but I am determined to get those darn chairs finished up soon. I'll share as soon as I do. Happy projects to you!

It certainly took me longer than I expected it to, but here is a link to Part 1 and Part 2 of reupholstering the dining room chairs.


Dining Table Paint Inspiration

Wednesday, September 9, 2015

A thing that happens when you like painting furniture is that your friends start giving you things they don't want. I am always excited when someone says, "I have this table/desk/dresser you might want..." My friend Erin inherited a dining table she couldn't really use so when she asked if I wanted it I said "Yes, please!" because I hoard furniture but also because I really like the style.

It's a Duncan Phyfe reproduction (I assume I didn't land a $2000 original) and it's in great condition, except that I don't really like the very cherry finish. I've been looking at different options for painting and refinishing.

Here's my favorite option so far.

Via
But I like these ones too.
Via
Via
Via
I want to use it in my own dining room because the table I have now only sits six, but this one has two leaves and can sit eight to ten. Bring on the dinner parties.

I also have eight of these Thomasville French chairs that I scored on craigslist for super cheap.
I'm super excited to try my hand at reupholstering them. I even have a mid century modern buffet in my garage waiting to be painted. I'll have a whole new dining room if I can just make up my mind and get started~hopefully tomorrow.


Weathered and Beachy Entertainment Cabinet

Monday, September 7, 2015

distressed and weathered paint
My friend/client used to live in Hawaii and so when she asked me to help her turn her family room into a home gym for her personal training business I suggested she go with a beachy vibe for the colors and decorations. There's not much furniture in the room, since it's for working out, but she did want to keep her tv and entertainment cabinet in there so I updated it with this weathered paint job.

Here is the cabinet before.
Here is the inspiration photo that Holly sent me of a console table her mom has.
And here is what we ended up with.
The cabinet has hardwood doors, and veneer sides and top. I used chalk paint because it sticks well to wood veneer, although it doesn't distress like the actual wood parts do.

To create this look you want to use a dry brush. I used a cheap brush with stiff bristles instead of my usual Purdy brushes so it would leave brush marks in the paint. I sanded lightly and then began with a messy coat of white paint, leaving a lot of the wood showing through.
After the white dried I did the same with a pale green, and after it dried, a pale blue. I kept the brush very dry by only lightly dipping the ends in the paint and then tapping off most of the paint on a paper plate. 


I used my palm sander to remove some of the paint and distress the edges and then I did a coat of clear wax.

At that point I decided to add some dark wax. I only used a little, and focused on putting it in the grooves to bring out those details. 
The map on the wall came out of a 1954 National Geographic that I found in an antique store in Petaluma. Even though they're not rare, like at all, I felt like I won the lottery.
Are you just crazy for old things? I sure am.
If you'd like to see other furniture I've painted, here is one of my favorite pieces, in a totally different style.

Linking up:


Use What You Have Guest Room Makeover, Part II

Wednesday, August 26, 2015

Look at me all posting part two (part one is here) of the guestroom makeover just like I said I would! Whoohoo!
I left off with this photo of the curtains I made and the tree branch curtain rod. It also exemplifies nicely my mad Craigslisting skills. Ever since I made the slipcovers for my couch I've been wanting to try making one for a wing back chair. Except I didn't have a wing back chair. But it only took a couple of days checking my local craigslist to find this one for thirty dollars. Unfortunately I haven't made a slip for it yet, but I did make a little throw pillow with fabric left over from the curtains.
 I also found this wardrobe on Craigslist for free. Yes friends, if you are as obsessed with furniture as I am you can do a quick check for what is free in your neighborhood and then race to try and pick it up before anyone else. You will usually lose, but sometimes you will win.
I
 Isn't this beautiful? And, magical. I was so proud when each of my children independently and unprompted tried to climb in and told me they were going to Narnia. 
The hinges were a bit wonky but again my handy hubby came to my rescue and fixed it up for me. 

The area rug you see is the one I used to have in my family room before I got all gung ho and bought a big one for in there. You are right, it needs to be shampooed. 

I'm pretty sentimental about this bed. The crocheted coverlet was made by my Grammy Tietz many years ago but I never had a bed that was safe from kids and pets to put it on until now. I would just pull it out of my hope chest every once in awhile and admire it and whisper, "we'll be together one day."
Can you even imagine doing all that? Me neither.

At the end of the bed I have a quilt folded up that I will love forever because it used to be on my beautiful sister, Lani's bed. She passed away in January and I like to go and lay my head on the quilt and miss her to myself.
And if that isn't sentimental enough for you I also brought in this cart that the previous owners of our home left in the storage room and put the bunnies that my sweet friend, Paige, knitted for me on it.
I think she should charge people big bucks for these cuties. Not me, obviously, but other people. They are so dang adorable!

Our internet router comes in through this room so I tried to disguise it a bit with stuff but I still need to work on that.
I'm letting you see it anyway because I like you and I think you won't judge me. Working with what you have means sometimes things aren't perfect, but I'm okay with that.


My Use What You Have Guest Bedroom Makeover, Part I

Sunday, August 23, 2015

This summer has just zoomed by and been full of lots of fun things that I hope to write about, but one thing I really don't want to skip is my guest bedroom makeover. This little room started out as a bedroom for Jonathan, even though it doesn't have a closet, and then served as a sort of catch all for our workout equipment and not in use furniture when he moved downstairs. We also made excellent use of it as a place to stash mess whenever someone is coming over where we could close the door and pretend I am a good housekeeper.

As usual, I get so excited to start a project that I forget to take before pictures. Here are some I snapped while I was prepping to paint.
Lovely, no? I had taken the first step and painted the bed here. If you're interested I used homemade chalk paint and Annie Sloan clear wax on it. 

The thing I like most about this little makeover is that I did it using a lot of what I already had and getting the "new to me" items on the cheap. Okay, you caught me, that's what I like about all my projects. I love the challenge of making a room better using more creativity than money, although I like money too.
I've often wondered how people with unlimited budgets decorate. Making a decision when the world is your oyster seems almost impossible to me; I always start with the things I already have and take my inspiration from there. Recently I realized that if money were no object I would have to actually give myself a limitation by first choosing a really special or unique inspiration item that everything else would have to work around.

I decided to sort of apply that principle here when I painted the bed we've had for over 15 years and used for several kids a bright green. I basically can't get enough of that color but I knew when I did it that everything else I did in the room would have to get in line and work with the green. 
 I also love this room because I got to go full steam ahead country cottage shabby chic farmhouse primitive-whatever you like to call it-in there.

Following the decorating order of operations, I painted the walls white and got to work sewing some simple curtains. I wanted a gingham pattern because it says farmhouse to me but I specifically chose this one because it was on clearance for $1.99 a yard. Can I get a high five for that? Custom curtains for less than twenty bucks-seriously-can't beat that. Although I am being loose and generous with the term "custom." I just cut rectangles and hemmed the edges, no lining or anything.

I showed Marc some pictures of branches as curtain rods, like this one
Via
 and my handy hubby got right to work.
I'll probably pull those leaves off soon, but I really liked how they looked when we first put it up.
Okay, I'm actually running out of time tonight, because people always think they should get dinner, so I'm going to finish this up with a part two, hopefully tomorrow.

I hope you like it. 

You can see the rest of this room redo here.

Linking up


Copyright © Barnaclebutt | Premade Blog Design by Lilipop Designs